
this blog contains affiliate links
Guest Sewist: Carol
Pattern: Paperbag Pants (capri and shorts, too)
Turning the Paperbag Trousers into Overalls/ Dungarees
Hello I am Carol , I have been a hobby sewist for over 60 years. Being retired I now have plenty of time for my hobby and it is great learning new things and pushing my boundaries. Usually my makes are children’s clothes for my 4 grandchildren, but I am now also embracing making my own clothes once again.
I am based in Salisbury in the south of England. Very close to Stonehenge and not far from Glastonbury. We have lots of great music festivals here so I am planning some festival worthy makes.
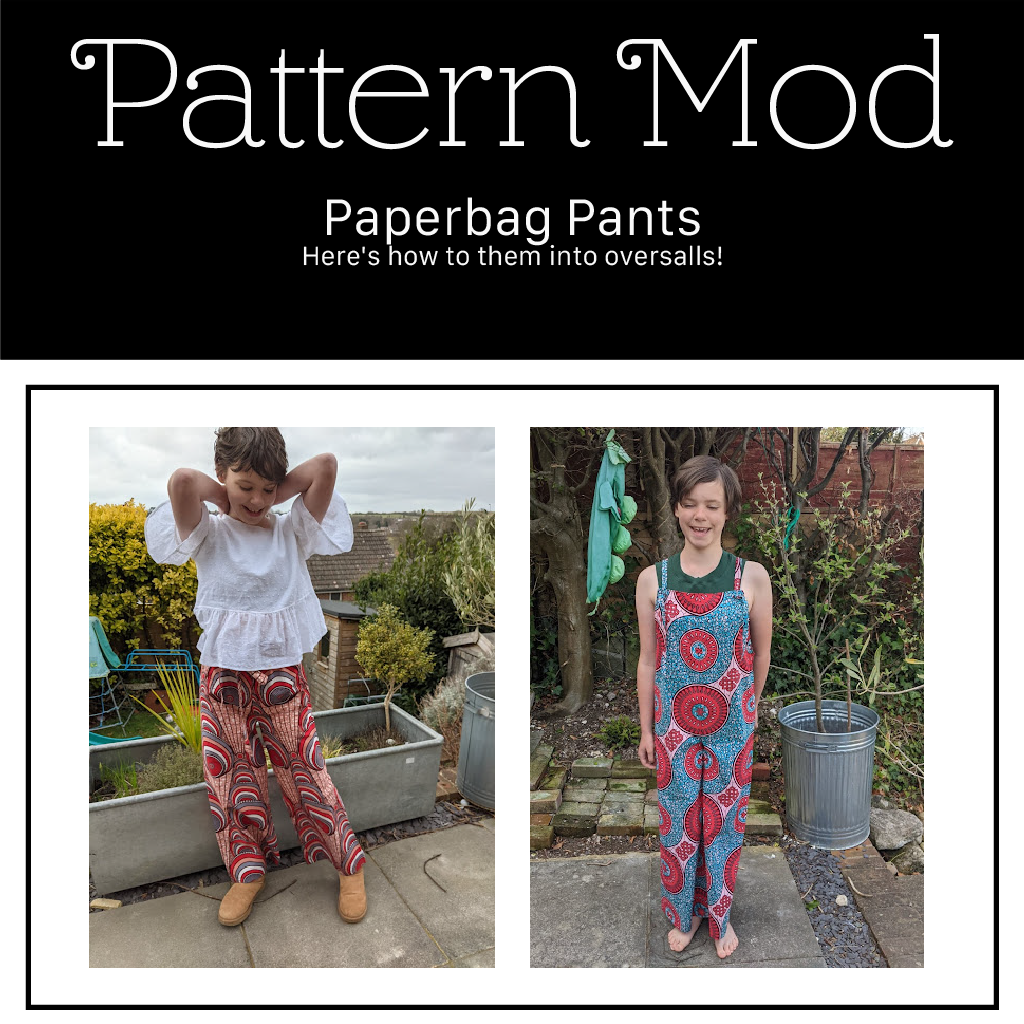
I made these Paperbag pants for the eldest grandchild from African wax fabric and it led me to think what else could I do with this pattern and I came up with dungarees.

What is needed?
The Paperbag pants pattern
[https://rain-city-pattern-company.myshopify.com?aff=336]
Your fabric
Thread
Tracing Paper
A marker pen
Ruler
Bias tape- shop bought or home made
Interfacing
Before starting I would make the pattern as it is drafted so you have a good idea re fit.
Step one
Trace a front and back bib shape from a pair of overalls you have already have. Mark front and back.

Step Two
Attach pieces to your main pattern piece. Front to front, back to back.

Step Three
You have now created your pattern piece. You are going to need to cut two mirrored pieces.

Be careful re matching pattern across the bibs.

Step Four
Fold each piece right sides together- arrows indicate bibs centre front.

Step Five
Sew the inside leg seams and neaten.

Step Six
Turn one piece inside out and pin the bib and crotch together with right sides facing. You are going to work an enclosed seam here. Sew with seam allowance of 2 mm.

Step Seven
Press your seam well on right side. Turn your garment inside out and press the centre seam so that the raw edges are enclosed and stitch a 3mm seam.

Step Eight
Try on and check fit. You may need to adjust bib shape, lower sides or add some side darts to prevent gapping.
I added a couple of back darts from mid back towards bottom to add a little shaping but still allowing for them to be easily pulled off.

Step Nine
Neaten the side edges by applying bias tape. I chose to apply on outside and turn to be hidden inside but it could be done as a binding so showing on the right side.
Topstitch carefully and then press well so all lies flat.

Step Ten
Fold over the top of the bib at front. Take a one cm then two cm turning. Add interfacing into front. Stitch. Work a buttonhole at each edge of bib.

Step Eleven
Make two straps the length from top of bib at back to bottom of arm holes at front. Width of these will be a matter of taste . I went for a 1 cm finished strap as my plan was to knot through the buttonhole. If you are adding buttons then you may want them wider and you may want to interface the end of the strap where you will attach the buttons.
Step Twelve
Fold back bib top 1 cm and then 2 cm towards wrong side. Pin end of each strap into the back bib. Stitch top of back bib securing the straps in place.

Try on check length and hem the legs of the dungarees.
You are done!
Was it a success?
Yes it worked and needed minimal work to adapt the pattern.
Would I do anything differently next time?
I would increase my leg width slightly so I could do enclosed seams on the legs.
I would also narrow the bib a little at front and a good couple of inches at the back- bringing it, I think this would improve how the straps sit over the shoulders.
Is grand daughter pleased?
Yes she is festival ready!