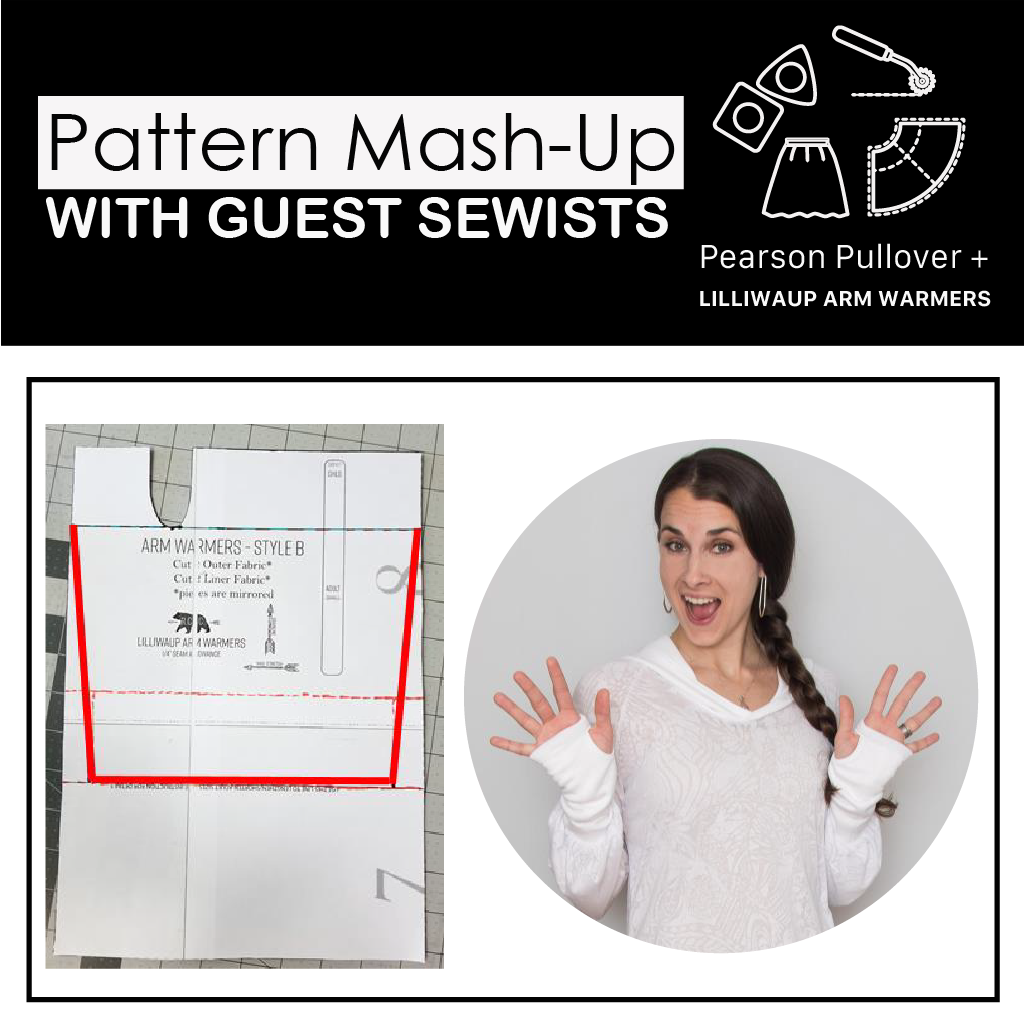
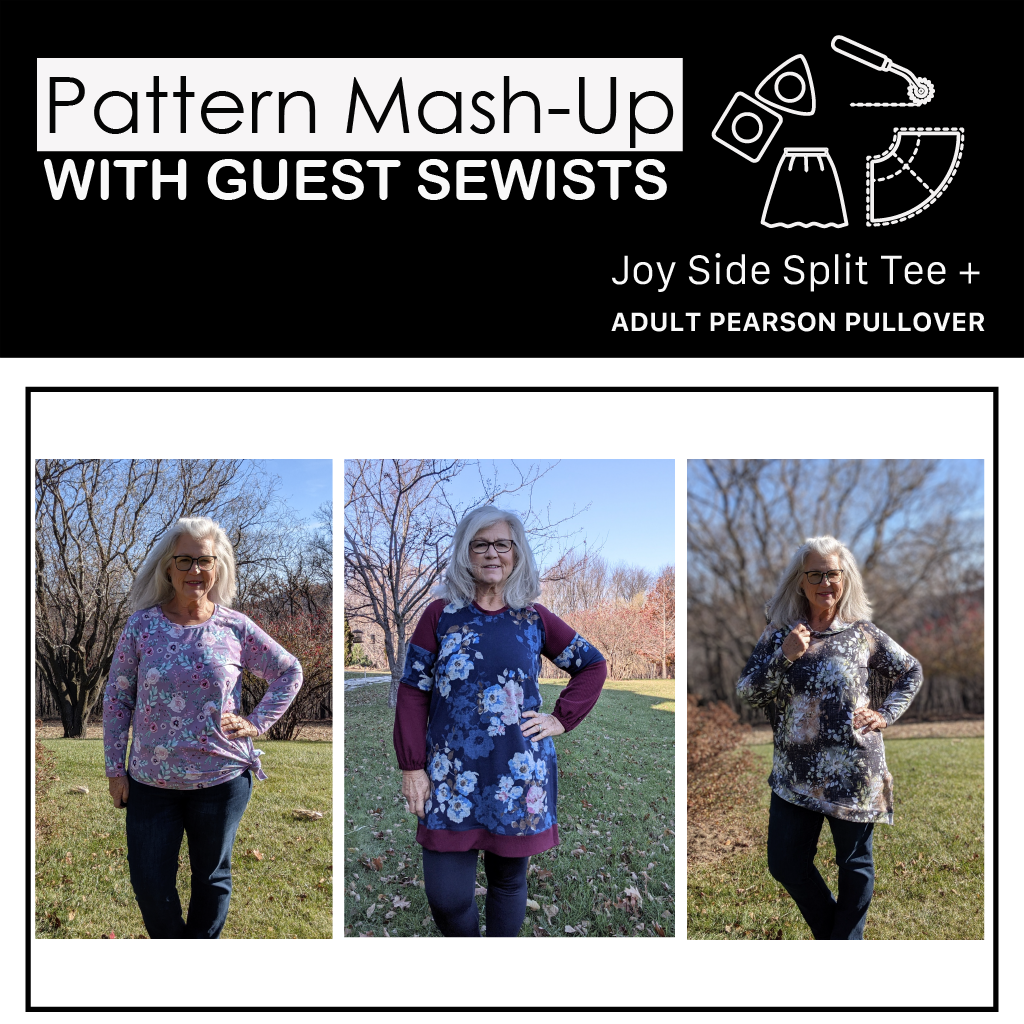
I selected to mash/hack the Pearson Pullover and the Joy top into a completely new design. There was a couple of interesting challenges with this combination because of the two different sleeve types...raglan on one and set-in/cap sleeve on the other. Don't lose heart, I'll tell you what to do if you'd like to give this new design a go.
The first step was to identify each of the design elements of the individual patterns. I made a side by side chart to compare as follows:
From this list I identified what I wanted to keep from each, what to change and what to combine.
After several line drawings and sleeping on it I settled on the raglan yoke and armscye with the body and band of the Pearson.
From the Joy I took the diagonal hem and the tapered sleeve. I changed the hood to cut into a collar from the Pearson making it a new design element altogether.
First up: I use a Projector to cut my patterns. That was not going to be possible with the mashing hacks that were swirling in my head so I projected and traced on paper giving me the new design pattern to cut out.
Sleeve: I traced off the raglan full gathered sleeve from the Pearson and then projected the Joy sleeve on top of that. I lined up the underarm points and drew the new straight sleeve from there.
Collar: I projected the hood onto paper and measured up 6" from the neck seam all the way around until the taper. I then gently reshaped the curve to blend nicely between the slope of the taper and the back seam. It first I just rounded it but this left the collar too wide at the front shoulder and I needed to redo it to be more flattering.

Body: My initial plan was to cut from the Pearson body on the fold with the Joy diagonal hemline. Had I done this I would have ended up with an inverted V in the center front and back!! Not in my vision of this design. So, I projected and traced off one side of the front (and the back) and flipped it over in the "place on fold" line and traced the other side. I wanted a bit of extra length so i dropped the hem down by 2" and then projected the Joy hemline over that to get my diagonal. I wanted to band this so I followed the same cutline to cut two bands 4" wide. Do not just cut a 4" strip across the grain and attach at a diagonal if you want the grainline to run uniformly. Cut a bit wider than your pattern to give room for a turned back hem at the split.
Assemble as you normally would: attach the raglan sleeves front and back, sew the side seams, sew the high side of the bands right side together. Determine where you would like your split to be and sew to that point. Attach the band lining up the closed side seam and letting the other end be a bit larger that the top. Press and topstitch or coverstitch the band as desired. Follow the side hem directions from Joy to finish the split opening. Sew the collar as per the hood from Pearson directions and attach. I like to coverstitch my neckline seam down. Hem the sleeves to your desired length.

Some thoughts: Next one I would lengthen the finished side seam a bit more and change the diagonal so that I would be more comfortable wearing this with leggings. At the length of this one it is too short for me to comfortably wear with leggings. I did lengthen my Pearson into a sweater dress as I had this beautiful fabric made in a swing dress that I sized out of. I wanted to get the most I could out of the fabric and really wanted a sweater dress so this worked perfectly and side splits seem to be all over the current fashion scene so I was right on trend. Don't you just love the beauty of sewing your own clothes??? I was short on fabric for the sleeves so borrowed the strip idea from the Joy but made it the width I needed to make up the length for the sleeve that I needed and sewed it in rather than stitched on top of the existing sleeve. Isn't it great that we live in a time of color blocking and zero waste??
I made my Joy out of custom Cotton Lycra and it was not one of the recommended fabrics. Don't do it. You really do need more drape to make this top shine. Pearson was made from sweater knit and brushed waffle and Joyson was from Cotton French Terry. I was afraid my design lines would fight between the diagonal of the hem and the raglan diagonal but not using a coordinating fabric and just letting the seamlines offer detail made this work, in my humble opinion at least.
I hope you like this new style and will consider giving it a try.
Happy Sewing,
Heidi


 Hi Fellow Sewists,